This post is for bloggers who already have a blog (on a platform like Tumblr or Blogger) who want to make that important move to WordPress. I recently did the move myself and was asked about how I did it in several emails. I wrote this resource for you. If you are NEW to blogging, read my other tutorial, How to Start a Blog.
Please note that some of the links below are affiliate links and I will earn a commission if you purchase through those links. I’m a customer at the companies I’m sharing below and recommend them because they’ve helped make my blog better and I trust them. If you feel out of your element with the steps or details of the tutorial, you can hire someone to help do it for you–email me for a recommendation.
Bringing Your Blog to WordPress
- You need a domain (.com) and hosting.
- Install WordPress. If you go with Bluehost, it’s a one-click install.
- Make your layout look good with a free or paid theme.
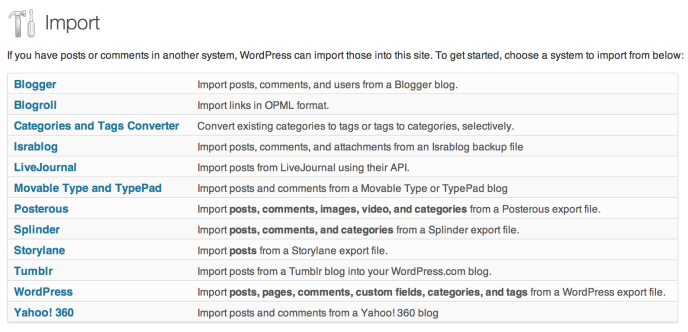
- Import your old posts from WordPress Dashboard -> Tools -> Import
- Change the permalinks with a WordPress plugin described below.
- Point your domain nameservers to your new host.
- Set up your blog email via your new host.
- Start growing your blog on WordPress!
Keep reading for detailed info.
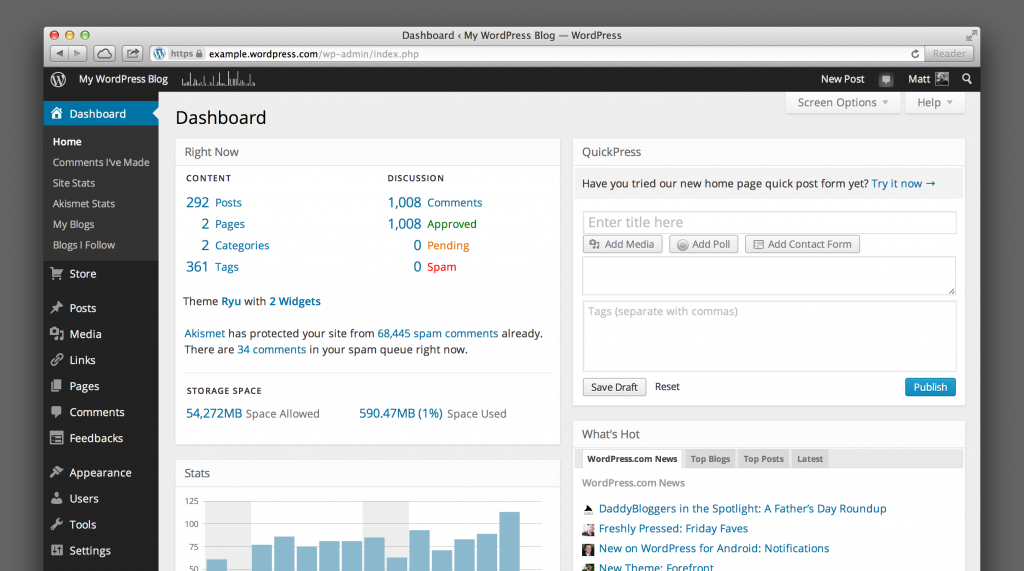
This is WordPress
Like many other bloggers, I’ve known I’ve had to make the switch to WordPress for a long time. It seemed like a daunting task. Would I have to hire someone to do it? Turns out, I could do it myself. I figured it out using Google and by asking Bluehost a few questions along the way (love their online chat support).
The Benefits of WordPress
If you want to take your blogging to the next level, WordPress can help. Yes, you likely know some great blogs that are on other platforms, but it’s undeniable that WordPress is the professional blogging platform. Moreover, many bloggers who’ve built good sites on free platforms really want to move to WordPress. Like these other bloggers, I wanted to switch because I wanted a more professional layout and better SEO—two things that I knew would help me grow my traffic and revenue.
In few words, it’s about putting your blog in the best position for it to GROW.
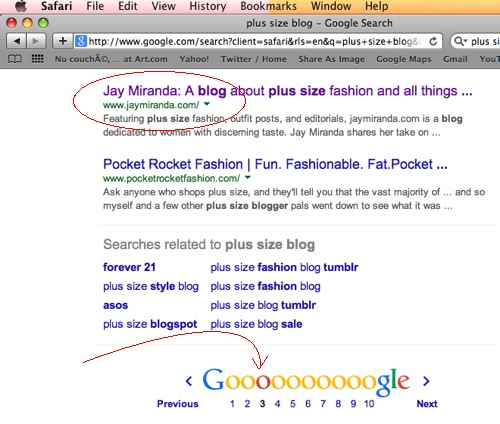
My page rank improved after I switched (it used to be on page 18 when you searched “plus size blog”)

My site design looks way better since I moved. There are also LOTS of layout options out there for WordPress.

More functionality: neat archive
How I Moved My Blog to WordPress Using a Temporary Domain
The benefit of setting up a temporary site meant I could work on my blog’s design and import all my old posts before having the domain point to WordPress. Plus, even if you mess up, have a question, or work on this slowly, you know your blog is up and running just as always since nothing changes over until you point your domain nameservers to Bluehost. This isn’t the only way to do it, but it meant my site would never “go down” while I made all the necessary changes and importing. That was important to me. For purposes of this tutorial, I will call my temporary domain “temporaryfakesite.com.” It could be anything though, and since it’s free, register something you’ve been wanting.
1. You need a .com domain and you need hosting. It’s the only way you can use a wordpress.org account.
After researching this subject for a long time, I decided to go with Bluehost. One reason I went with them is because they had great recommendations and they had a one-click install of WordPress. By the way, Bluehost is genuinely awesome – their customer service is excellent (both over the phone and via online chat) and it really sets them apart.
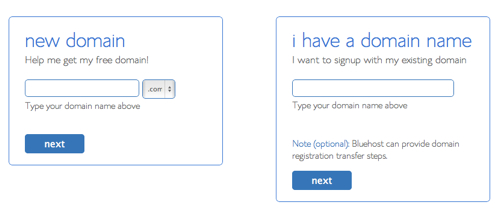
Here’s how I did it. I went with their option to set up a new FREE domain to be my temporary site.
2. I ended up choosing the 12 month price. A year of hosting for about $80 is pretty good! I know there are a lot of companies out there and maybe some cheaper ones, but the two reasons I went with Bluehost is they were recommended by bloggers I respect and the customer service is known to be great – exactly you need as a site owner in case you ever have a question. I un-clicked all the extra features, remember this is your temporary site.
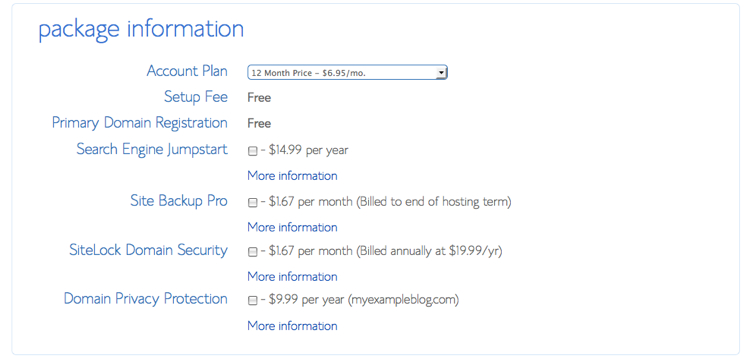
Select your desired plan
3. After your account is set up, you install WordPress (it’s a simple install, all from your Bluehost account page).

Click WordPress
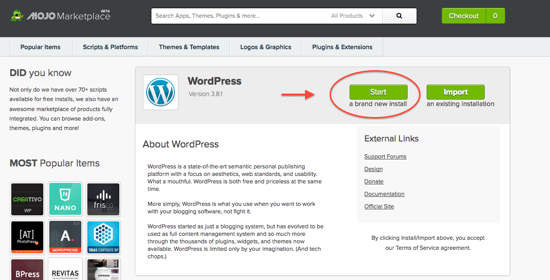
Click START. On the next page, fill out username info, then click INSTALL NOW. You’ll see you have a WordPress Login page. Save that for now.
4. Next, login and familiarize yourself with how WordPress works–just get the lay of the land. After I did this, I hopped on Bluehost tech support (online or over the phone and asked them to set up a DIRECTORY on this temporary domain. The Bluehost guy hooked me up fast with “temporaryfakesite.com/jaymiranda” and set me up with a separate WordPress login page for that directory. This is going to be your REAL WordPress login going forward, so bookmark that link.
5. Working from, “temporaryfakesite.com/jaymiranda,” I logged in to WordPress. Next, I worked on my blog’s theme/layout. You can choose a free layout on WordPress to customize. You can also buy one. I ended up using StudioPress Themes for WordPress. I recommend them because they are easy to use and there is a big marketplace from which to choose the best layout for your particular blog.
6. Next, I imported my old blog posts. Go to Tools -> Import to start the process for your individual blogging platform. All the major ones are covered. Depending on the format of your original blog, some posts may be formatted a little differently in WordPress. Most of mine were perfect, but I allotted some time to make those edits.
7. This next part is important. You may be thinking, what about all my old links? You will have to choose a permalink structure for your on your WordPress site (under Settings). That will render your old links out there ineffective once your domain is pointing to WordPress–BUT there is a Redirection plugin option. This decision is solely up to you. Some people fear they will lose SEO when their links change, so they really advocate using the Redirect plugin.
Now, I didn’t redirect my links because I found the only way I could use it was if I made my permalinks “mysite.com/post-name” and I prefer my links to use the date structure, “mysite/year-month-day/post-name” because when you have a lot of posts, your site runs faster on this link structure. Personally, I decided I needed the boost in SEO power + everything WordPress offered going forward more than what I already had in terms of links out in the internet and I decided I could slowly re-promote old content with new links. I’m not sure you can quantify SEO (right?) but I didn’t feel like I had much to lose, the big jump in page rank after the switch pretty much confirmed it to me. This one is your call!
8. Although I didn’t redirect my links, I did have to work a little on the permalink structure anyway. If you used the temporary domain option, you will have to do this too. Since I built the WordPress site on a temporary domain, all the posts had temprorary domain URLs. I had to change it back to “mysite.com” so in order to do that I used the Search and Replace plugin. Be sure to follow the plugin’s instructions carefully and fill out the “Replace With” part carefully. Once I finished this step, I did encounter some trouble with some page links not working properly but I made a quick call to Bluehost and they sorted it out for me. Just giving you a heads up!
9. I was unable to import Disqus comments – unfortunate but not that big a deal to me.
10. Once the site looked exactly how I wanted, I was ready to make my domain (jaymiranda.com) point to my new site on WordPress. I had to change the nameservers of my blog’s account on GoDaddy (where my domain was registered before switching to Bluehost). Next, I made sure to set up my email on my Bluehost account since my email had been set up with GoDaddy and that stopped working once I changed the nameservers. You can set up the same ___@mysite.com email you’ve always had.
As a further step, you can fully transfer the domain to Bluehost. It’s a good idea to do it eventually if your domain was set up with another registrar. For now, changing the nameservers is all you need though!
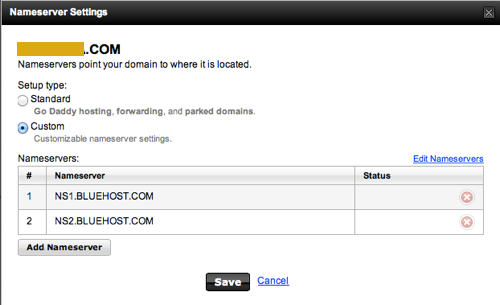
Changing Nameservers on GoDaddy
Congrats! Your blog is on WordPress.
Final notes: The nameserver change is different from transferring the domain itself to Bluehost, but you can do that through your Bluehost account page. It costs something like $12 since it’s essentially re-registering it for a year. If you don’t want to renew the temporary site the following year, contact Bluehost first so that you’re sure nothing impacts your site by letting the other one expire.